Plesk Tutorial: How to Backup and Restore Files in Plesk Panel
Creating regular backups are an integral part of any website maintenance activity. Backups can restrict the damage caused due to unforeseen events like server crash, hacking or files getting corrupt; thus saving you from the pain of recreating your website inventory (files, databases, users) all over again. Plesk Panel comes with an easy-to-use Backup Manager tool, which can be used to schedule backup and restore them whenever the need arises.
In this tutorial, we will discuss in detail the step by step procedure to backup and restore files using Plesk Panel hosting interface.
STEP-1: Once you login to your Plesk Panel interface, use the top navigation menu to go to “Websites & Domains” tab.
STEP-2: Click on the “Back Up” (Backup Manager in newer versions) icon, it will open Backup Manager Tools interface. This is the main backup interface in Plesk from which you can either schedule a backup to run at a convenient time in future, or create an immediate backup and download it to your hard disk drive. If you want to restore a copy of a previously taken back-up, it has to be initiated from this page as well.
STEP-3: First, we will learn how to schedule a backup.
Click on the second icon that reads “Scheduled Backup”. Check the box next to “Activate this backup task” to activate your new backup schedule. Provide inputs for back up period (Daily/Weekly/Monthly) and backup execution time. You would also need to enter a prefix to the back-up name and mention the number of backups you want to store in your hard disk drive. Provide an email address to send you the backup log, so that you can analyze the log file in the case of an unsuccessful backup.
Upon providing all these details, click on “OK” button which would be located at the bottom of the page. A notification will be shown once the backup is scheduled.
STEP-4: Now we will learn the process of creating an immediate backup. On the Backup Manager Tools page (refer to Step-1), click on the “Back Up” icon (earlier we clicked on Scheduled Backup). In recent versions of Plesk, this icon will read as “Backup Now”.
STEP-5: Input a file name for the backup and your comments (if any) in appropriate text boxes. Then click on “Backup Now” button. The backup process would start immediately.
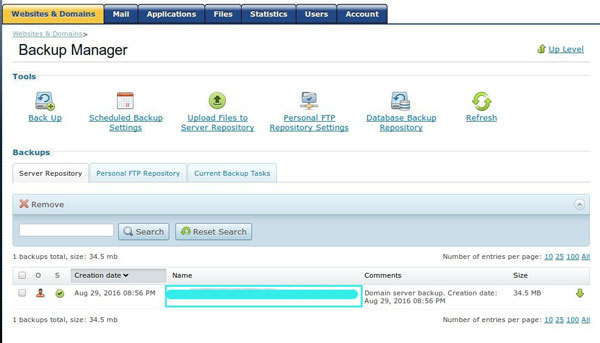
You can go to “Current Backup Tasks” tab inside “Backup Tools” interface to see the progress. Once the backup gets completed, you can go to “Server Repository” tab on the same page and see the backup file listed there.
If required, you can download the backup file to your local computer by clicking on the “Save” button located at the bottom of the right corner.
STEP-6: Last, but not the least, we need to learn the restoration process.
To restore a previously taken backup, you need to go back to the “Tools” page. On the bottom of the Tools interface, there will be a table named “Existing Backup Files”. All the backups that you have created so far will be listed in that table. To restore a particular backup file, simply select the appropriate backup and click on “Restore” button. It will ask for your confirmation to begin the restoration process. Click on “Yes”.
To delete a backup file, select the line item from the “Existing Backup Files” table and click on “Remove Selected” link.


")
