Plesk Panel Tutorial – Creating a Password Protected Directory
Directories or sub-directories inside your publicly available content (public.html folder) on your website can be prevented from being accessed by general visitors by using a password as the shield.
There are several ways in which it can be achieved. The most common of all is to use the inbuilt feature that comes with select control panels, such as cPanel, Plesk or DirectAdmin. However, if the control panel that you are using does not come integrated with this feature, you can modify your .htaccess file manually to set up a rule as per your access requirement.
In this tutorial, we will be guiding you through the process of creating a password protected directory using Plesk Panel hosting interface.
The tutorial can be divided in to two major parts. The first part will depict the creation of the directory structure (URL) which you wish to protect with a password. The second part will guide you through the creation of a user and setting up password for accessing the protected URL.
PART-1: Creating the URL (Directory) to Be Protected
STEP-1: Log in to your Plesk Panel admin interface and go to “Domains” section using the left navigation pane. Click on the domain name in which you wish to create the password protected directory.
STEP-2: Scroll down to the “Hosting” section on your domain homepage and click on “Protected URLs” icon.
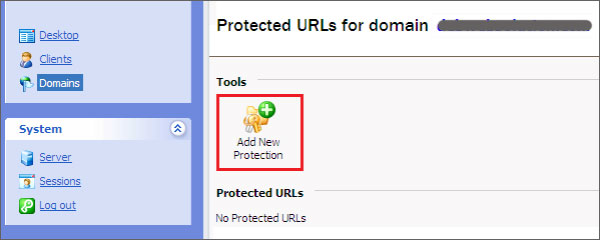
STEP-3: Now you are in the “Tools” interface inside “Protected URLs”. This page also shows the list of your previously Protected URLs. Click on the icon “Add New”. It will lead you to the “Preferences” page.
STEP-4: You need to provide inputs for two things here:
URL, and
Realm access text.
URL is nothing but the directory (folder) name that you wish protect with a password. Please note that this URL field is a relative path to your root directory (public.html folder / domain name), so you need not include your domain name and extension. Just enter the name of the folder preceeded by ‘/’.
For example, if you want to create a password protected directory for “Personal” sub-folder located inside a domain name http://yourdomainname.com, you need to enter “/personal” in the URL input-box instead of the complete directory path – http://yourdomainname.com/personal.
“Realm access text” is the message that gets displayed to your visitor who tries to access the password protected directory. This field is not mandatory in nature. Fill in both the input boxes and click on the “Ok” button.
STEP-5: Click on the “back” button to go back to the “Protected URLs Tools” page. Now you will be able to see your newly created directory listed in the table located at the bottom end of the page.
With this we have successfully created the directory structure (URL) that we wish to protect. That’s the end of the first part of the tutorial. Now we will move to the next part, i.e., creation of a user and setting up a password for accessing the URL.
PART-2: Creating User and Setting up Password
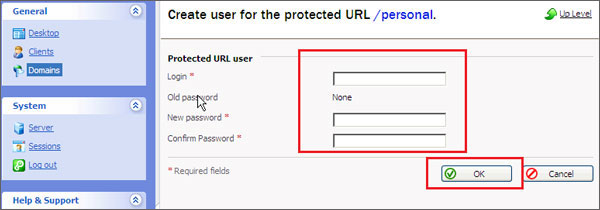
STEP-1: On the “Protected URLs Tools” page, click on the URL that you have created in Part-1. Then you need to click on the icon “Add New User”.
STEP-2: Type the desired user name in the “Login” input box. Provide a password in the “New Password” field and repeat the same in “Confirm Password” box. All the three input boxes must be filled up before you click on the “Ok” button.
STEP-3: Go back to the previous page using the “Back” button. “Protected URL Users” table will now have the newly created user name listed over there.
Open your web browser and type the URL – http://yourdomainname.com/personal.
It will display a notification – “Authorization required” and prompt you to enter a user name and password. You need to enter the user credential that you had created in Part-2 above. After validating the user/password combination, you will be able to access the password protected directory.


")


